内核驱动踩坑记录
内核驱动踩坑记录
前言
推荐阅读:
《C和指针》 《C专家编程》 《C陷阱与缺陷》
《Linux设备驱动程序》 《linux内核设计与实现》 《深入理解linux内核》
《Debug Hacks中文版—深入调试的技术和工具》
第一要义:学会放弃
第二要义:不要修改代码屎山
第三要义:遇到无法解决的问题/BUG,备份代码后重构代码
第四要义:若BUG实在无法解决,尝试不同的实现方式,不过于追求简洁与优雅
相关驱动:
块设备驱动,网卡驱动
内核版本:4.19/5.4
驱动开发背景:
块设备驱动特点:一次只能发送一条指令,需同时实现协议栈请求与ioctl请求处理
网卡驱动特点:驱动移植,将以字符设备实现的网卡驱动移植为以网络设备实现的网卡驱动,将用户态代码移植内核态
一:银河麒麟操作系统+飞腾处理器
内核切换后显卡驱动失效问题
内核切换后网卡驱动失效问题
内核切换后glibc冲突问题
networking restart失败
内核切换后安装常见软件均失败
切换内核时make install显示:
Error! Bad return status for module build on kernel:4.19.0(aarch64)
Consult /var/lib/dkms/nvidia/460.32.03/build/make.log for more information.
解决:
删除 /var/lib/dkms/nvidia整个文件夹即可
update-grub时未发现刚install的内核,只有原系统的image
解决:编译版本的image未被安装至/boot文件夹,复制编译目录/arch/arm64中image至/boot,并按对应格式重命名。不过看/boot目录下原系统拥有Image和uImage文件,但arm64目录下只有一个Image,我们直接复制两份,分别改成Image和uImage。
此处省略一万字
二:用户空间访问问题
块设备驱动提供ioctl接口供用户直接向特定扇区读写数据,在ioctl系统调用参数中传递用户缓冲区的地址。ioctl内核处理函数中直接将请求打包成相应的命令,加入SSD请求队列等待执行。由于未实现中断功能,利用定时器定时轮询对应位置查看命令执行情况并在设备空闲时发送请求。此时调用copy_from_user函数失败。这是因为定时器回调函数是异步执行的,它类似于一种“软件中断”,而且是处于非进程的上下文中,所以回调函数必须遵守以下规则:
- 没有 current 指针、不允许访问用户空间。因为没有进程上下文,相关代码和被中断的进程没有任何联系。
- 不能执行休眠(或可能引起休眠的函数)和调度。
- 任何被访问的数据结构都应该针对并发访问进行保护,以防止竞争条件。
inux内核timer执行上下文,内核定时器的使用(好几个例子add_timer)
解决:
如果是写命令,先将数据写入申请的内核缓冲区,再将内核缓冲区的地址写入命令。如果是读命令,先将读到的数据写入内核缓冲区,再将数据写入用户缓冲区。
ioctl请求的一般执行过程为:①解析参数 ②申请内核缓冲区存放数据 ③ 将请求封装成命令,加入命令队列 ④等待命令执行完成,并执行必要的数据传输工作。
三:模块卸载出错
有时候编写代码时并不会检查函数返回值等信息,有时候资源并没有申请成功,而在.remove函数中却照常进行了资源释放,或者申请了资源却忘了在remove函数中进行释放,便会造成空指针 死机等一系列的后果。
例如在.probe函数中注册了定时器却忘了注销,注册块设备失败却照常注销块设备,get_device与put_device数目不一致
add_timer(&hps_dev->timer);                         //注册定时器
del_timer(&hps_dev->timer);                       //注销定时器
device_add_disk(hps_dev->dev, hps_dev->disk, hps_attr_groups); // 注册块设备
del_gendisk(hps_dev->disk);                       // 移除块设备
hps_dev->dev = get_device(&pdev->dev);			  // 增加设备计数
put_device(hps_dev->dev);                         // 减小设备计数
所以比较安全的方式就是增加出错处理代码或在资源释放时判断是否持有。
ret = request();
if(ret!=0){
	// 出错处理
}

if(hold(p)) release p;
四:DMA缓冲区大小问题
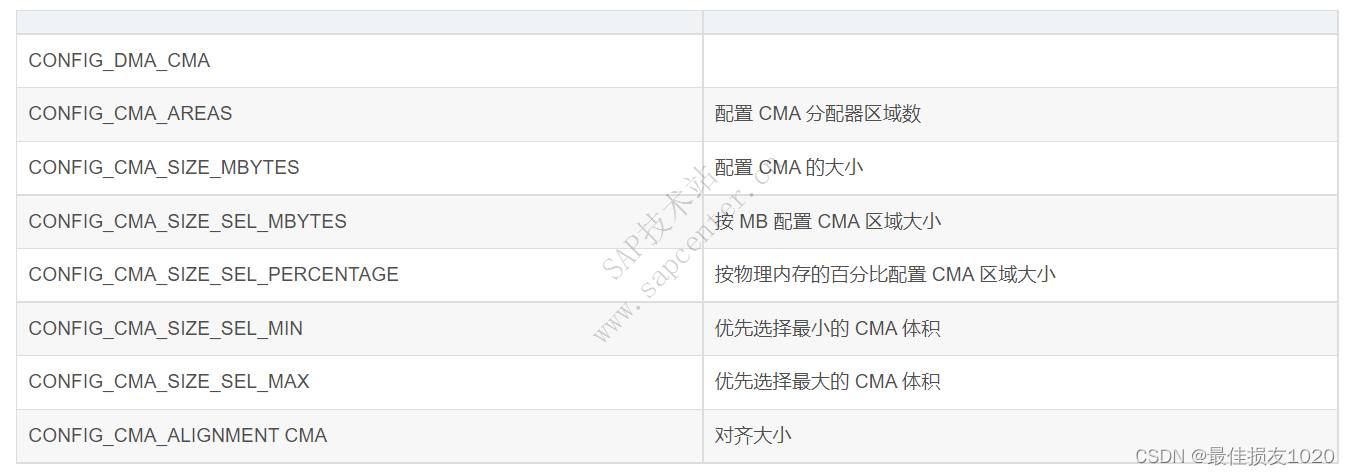
dma_alloc_coherent函数申请超过4M便会报错,配置CMA使DMA能够申请更大的空间,这可能需要需要重新编译内核(如果高版本宿主机编译内核建议先通过deb安装文件切换至相近版本的内核,再通过源码编译内核)。
dev->data_buf = dma_alloc_coherent(dev->dev, MAX_DATA_SIZE, &dev->data_buf_dma_addr, GFP_KERNEL);
参考博客:
dma_alloc_coherent 申请内存用法和问题总结
在Linux内核模块中使用CMA内存分配

大致步骤如下:
cat /boot/config-$(uname -r) | grep DMA_CMA  # 查看当前内核是否开启了CMA功能
如果不存在则需要重新编译内核,建议配置内核时顺带勾选kgdb选项
CONFIG_DMA_CMA选项没在memuconfig找到,可直接通过vim .config修改,也可将其他的CMA选项打开
在编译内核是会选择CMA空间大小,后面也可以在grub配置文件中修改相应大小。
cat /proc/meminfo # 查看是否修改成功
CmaTotal:        1048576 kB
CmaFree:         1048576 kB
dmesg | grep cma # 显示内核启动时cma相关信息
配置成功后就能申请更大的连续物理内存
五:linux内存页大小问题
在用户程序中使用mmap系统调用,传入的映射长度为32k,可是内核mmap处理函数中vm_area的长度却显示为64k。
void* mmap(void* start,size_t length,int prot,int flags,int fd,off_t offset);
int munmap(void* start,size_t length);
解决:
getconf PAGE_SIZE # 查看当前页大小
65536
mmap 必须以PAGE_SIZE为单位进行映射,而内存也只能以页为单位进行映射,若要映射非PAGE_SIZE整数倍的地址范围,要先进行内存对齐,强行以PAGE_SIZE的倍数大小进行映射。由于传入长度小于64k,进行了一次向上取整。故重新编译内核,在menuconfig中修改page size。
六:网络不稳定,同属于一个局域网却不能ping通
通过打印内核启动时的信息可以发现网卡在一直自动协商连接速度,通过ethtool工具关闭自动协商功能即可。
# 将网卡eth2速度固定1000M,双工,且关闭自动协商
sudo ethtool -s eth2 speed 1000 duplex full autoneg off
七:BUG: scheduling while atomic
在定时器的回调函数中调用msleep函数,造成BUG: scheduling while atomic错误,输出一长串的警告(dump_stack,backtrace之类的),这是因为定时器回调函数处于原子上下文,不允许系统调度,调用休眠函数后就会引发这个问题。但很奇怪的是,网卡驱动中的start_xmit函数中调用休眠函数也会报这个错误,这个函数也处于原子上下文吗?可以通过preempt_count判断内核当前处于原子上下文还是进程上下文。

如果是分配内存,可以将GFP_ KERNEL标志改成 GFP_ATOMIC
内存申请 GFP_KERNEL GFP_ATOMIC
BUG: scheduling while atomic 分析
用户空间与内核空间,进程上下文与中断上下文[总结]
Linux中的preempt_count
八:设备名混淆错误
在编写参照r8169编写网卡驱动时,误以为dev变量为struct device类型的通用设备,后面才发现为struct net_device类型,但内核中全用dev来命名,比较容易混淆。最奇怪的是,一个用来解析协议类型的函数竟然顺带对skb的dev赋值,使得这个错误比较难被发现。
skb->protocol = eth_type_trans(skb, dev);
__be16 eth_type_trans(struct sk_buff *skb, struct net_device *dev)
{
	unsigned short _service_access_point;
	const unsigned short *sap;
	const struct ethhdr *eth;

	skb->dev = dev;
	skb_reset_mac_header(skb);

	eth = (struct ethhdr *)skb->data;
	skb_pull_inline(skb, ETH_HLEN);

	if (unlikely(is_multicast_ether_addr_64bits(eth->h_dest))) {
		if (ether_addr_equal_64bits(eth->h_dest, dev->broadcast))
			skb->pkt_type = PACKET_BROADCAST;
		else
			skb->pkt_type = PACKET_MULTICAST;
	}
	else if (unlikely(!ether_addr_equal_64bits(eth->h_dest,
						   dev->dev_addr)))
		skb->pkt_type = PACKET_OTHERHOST;

	/*
	 * Some variants of DSA tagging don't have an ethertype field
	 * at all, so we check here whether one of those tagging
	 * variants has been configured on the receiving interface,
	 * and if so, set skb->protocol without looking at the packet.
	 */
	if (unlikely(netdev_uses_dsa(dev)))
		return htons(ETH_P_XDSA);

	if (likely(eth_proto_is_802_3(eth->h_proto)))
		return eth->h_proto;

	/*
	 *      This is a magic hack to spot IPX packets. Older Novell breaks
	 *      the protocol design and runs IPX over 802.3 without an 802.2 LLC
	 *      layer. We look for FFFF which isn't a used 802.2 SSAP/DSAP. This
	 *      won't work for fault tolerant netware but does for the rest.
	 */
	sap = skb_header_pointer(skb, 0, sizeof(*sap), &_service_access_point);
	if (sap && *sap == 0xFFFF)
		return htons(ETH_P_802_3);

	/*
	 *      Real 802.2 LLC
	 */
	return htons(ETH_P_802_2);
}
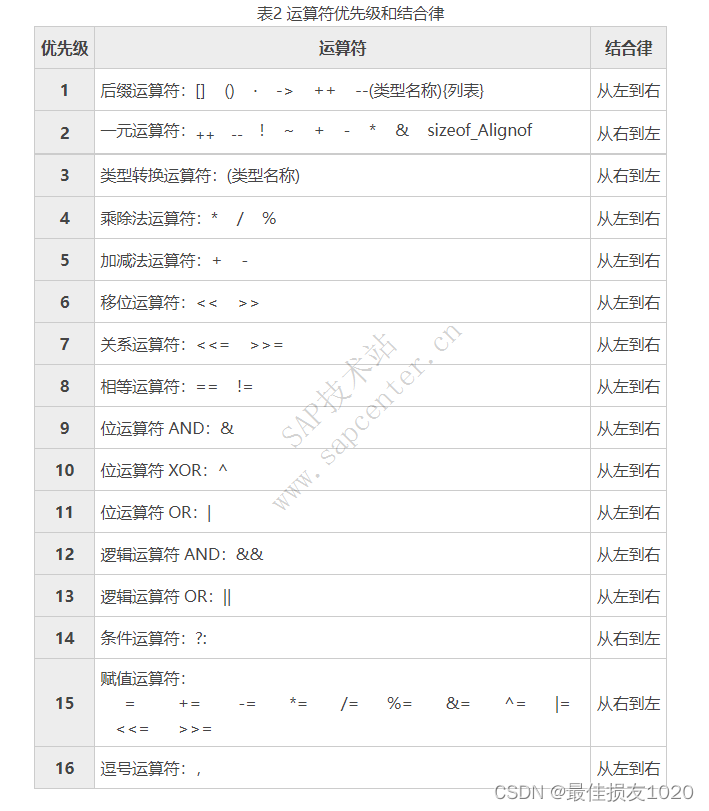
九:运算符优先级
int main() {
  int type = 0x80001;
  if (type & 0xf == 0x1) {
    printf("branch 1\n");
  } else if (type & 0xf == 0x2) {
    printf("branch 2\n");
  } else {
    printf("branch 3\n");
  }
  if ((type & 0xf) == 0x1) {
    printf("branch 1\n");
  } else if ((type & 0xf) == 0x2) {
    printf("branch 2\n");
  } else {
    printf("branch 3\n");
  }
  printf("%d %d\n", 0xf == 0x1, type & 0xf == 0x1);
}
// branch 3
// branch 1
// 0 0
相等运算符优先级高于位运算符,故先执行==,得到结果0,再与type进行与。
十:网卡驱动提供修改MTU接口
提供简单Set方法,并在探测函数中设置min_mtu max_mtu mtu值
// 示例代码 r8169.c
.ndo_change_mtu		= rtl8169_change_mtu,
5855  static int rtl8169_change_mtu(struct net_device *dev, int new_mtu)
5856  {
5864  	dev->mtu = new_mtu;
5867  	return 0;
5868  }

7626  	/* MTU range: 60 - hw-specific max */
7627  	dev->min_mtu = ETH_ZLEN;
7629  	dev->max_mtu = jumbo_max;
十一:收包与napi
由于网卡对于收包速度要求较高,且并没有实现中断功能,故只能通过轮询的方式收包。
有两种方式实现该功能:
1 使用kthread_run另开一个线程,持续查询是否有数据包到来
2 使用napi机制
在刚开始的时候我错误理解了napi poll的时机,采用的是定时器+napi的方式,每次在定时器过期时调用napi_schedule_irqoff函数,启动轮询,而在每次轮询中调用napi_complete函数并返回1。但问题是定时器中断频率太低,远远达不到性能需求。后面看了看napi相关文章才发现,只要轮询函数中每次返回的值为当前权值/额度,内核就会认为网卡还有消息包需要处理,会将该任务重新加入轮询队列,故没必要使用定时器,也没必要在轮询函数中调用napi_complete函数。
复制粘贴一些napi相关函数注释加深印象(源码在线查询网站:bootlin)
/**
 * netif_napi_add() - initialize a NAPI context
 * @dev:  network device
 * @napi: NAPI context
 * @poll: polling function
 * @weight: default weight
 *
 * netif_napi_add() must be used to initialize a NAPI context prior to calling
 * *any* of the other NAPI-related functions.
 */
static inline void
netif_napi_add(struct net_device *dev, struct napi_struct *napi,
	       int (*poll)(struct napi_struct *, int), int weight)

/**
 *	napi_enable - enable NAPI scheduling
 *	@n: NAPI context
 *
 * Resume NAPI from being scheduled on this context.
 * Must be paired with napi_disable.
 */
void napi_enable(struct napi_struct *n)

/**
 *	napi_schedule - schedule NAPI poll
 *	@n: NAPI context
 *
 * Schedule NAPI poll routine to be called if it is not already
 * running.
 */
static inline void napi_schedule(struct napi_struct *n)
{
	if (napi_schedule_prep(n))
		__napi_schedule(n);
}

/**
 *	napi_schedule_irqoff - schedule NAPI poll
 *	@n: NAPI context
 *
 * Variant of napi_schedule(), assuming hard irqs are masked.
 */
static inline void napi_schedule_irqoff(struct napi_struct *n)
{
	if (napi_schedule_prep(n))
		__napi_schedule_irqoff(n);
}

/**
 *	napi_schedule_prep - check if napi can be scheduled
 *	@n: napi context
 *
 * Test if NAPI routine is already running, and if not mark
 * it as running.  This is used as a condition variable to
 * insure only one NAPI poll instance runs.  We also make
 * sure there is no pending NAPI disable.
 */
bool napi_schedule_prep(struct napi_struct *n)

/**
 *	napi_complete - NAPI processing complete
 *	@n: NAPI context
 *
 * Mark NAPI processing as complete.
 * Consider using napi_complete_done() instead.
 * Return false if device should avoid rearming interrupts.
 */
static inline bool napi_complete(struct napi_struct *n)
{
	return napi_complete_done(n, 0);
}

static inline struct sk_buff *napi_alloc_skb(struct napi_struct *napi,
					     unsigned int length)
{
	return __napi_alloc_skb(napi, length, GFP_ATOMIC);
}
/**
 *	__napi_alloc_skb - allocate skbuff for rx in a specific NAPI instance
 *	@napi: napi instance this buffer was allocated for
 *	@len: length to allocate
 *	@gfp_mask: get_free_pages mask, passed to alloc_skb and alloc_pages
 *
 *	Allocate a new sk_buff for use in NAPI receive.  This buffer will
 *	attempt to allocate the head from a special reserved region used
 *	only for NAPI Rx allocation.  By doing this we can save several
 *	CPU cycles by avoiding having to disable and re-enable IRQs.
 *
 *	%NULL is returned if there is no free memory.
 */
struct sk_buff *__napi_alloc_skb(struct napi_struct *napi, unsigned int len,
				 gfp_t gfp_mask)

int netif_rx(struct sk_buff *skb);
int __netif_rx(struct sk_buff *skb);
int netif_receive_skb(struct sk_buff *skb);
int netif_receive_skb_core(struct sk_buff *skb);
void netif_receive_skb_list_internal(struct list_head *head);
void netif_receive_skb_list(struct list_head *head);
gro_result_t napi_gro_receive(struct napi_struct *napi, struct sk_buff *skb);

/**
 *	netif_rx	-	post buffer to the network code
 *	@skb: buffer to post
 *
 *	This function receives a packet from a device driver and queues it for
 *	the upper (protocol) levels to process via the backlog NAPI device. It
 *	always succeeds. The buffer may be dropped during processing for
 *	congestion control or by the protocol layers.
 *	The network buffer is passed via the backlog NAPI device. Modern NIC
 *	driver should use NAPI and GRO.
 *	This function can used from interrupt and from process context. The
 *	caller from process context must not disable interrupts before invoking
 *	this function.
 *
 *	return values:
 *	NET_RX_SUCCESS	(no congestion)
 *	NET_RX_DROP     (packet was dropped)
 *
 */
int netif_rx(struct sk_buff *skb)

/**
 *	netif_receive_skb - process receive buffer from network
 *	@skb: buffer to process
 *
 *	netif_receive_skb() is the main receive data processing function.
 *	It always succeeds. The buffer may be dropped during processing
 *	for congestion control or by the protocol layers.
 *
 *	This function may only be called from softirq context and interrupts
 *	should be enabled.
 *
 *	Return values (usually ignored):
 *	NET_RX_SUCCESS: no congestion
 *	NET_RX_DROP: packet was dropped
 */
int netif_receive_skb(struct sk_buff *skb)


/**
 *	netif_receive_skb_core - special purpose version of netif_receive_skb
 *	@skb: buffer to process
 *
 *	More direct receive version of netif_receive_skb().  It should
 *	only be used by callers that have a need to skip RPS and Generic XDP.
 *	Caller must also take care of handling if ``(page_is_)pfmemalloc``.
 *
 *	This function may only be called from softirq context and interrupts
 *	should be enabled.
 *
 *	Return values (usually ignored):
 *	NET_RX_SUCCESS: no congestion
 *	NET_RX_DROP: packet was dropped
 */
int netif_receive_skb_core(struct sk_buff *skb)

gro_result_t napi_gro_receive(struct napi_struct *napi, struct sk_buff *skb)
{
	gro_result_t ret;

	skb_mark_napi_id(skb, napi);
	trace_napi_gro_receive_entry(skb);

	skb_gro_reset_offset(skb, 0);

	ret = napi_skb_finish(napi, skb, dev_gro_receive(napi, skb));
	trace_napi_gro_receive_exit(ret);

	return ret;
}
相关博客:
NAPI机制
Linux NAPI机制分析
十二:mac设置问题
在编写网卡驱动代码时,并没有仔细设置mac地址的值,在完成网卡驱动大致功能时,发现只能通过UDP进行通信(禁用arp时),而无法使用TCP进行通信。使用tcpdump -i 指定网卡 追踪网卡数据包时发现client向server发起第一次握手,但server迟迟没有回应,client一次次重复发送SYN数据包,最终TCP连接失败,同时也能看见一些ARP数据包显示oui unknown。使用arp -a显示当前ip与mac地址映射,发现对应IP地址的mac地址显示incomplete
问题原因:有时候设备随机设置的mac不是单播地址,mac地址无效。需设置成有效的mac地址(复制现有网卡mac地址前24位,后24位随便打即可)
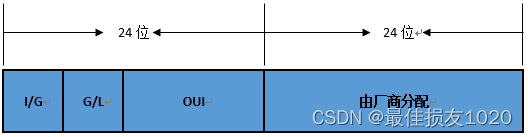
组织唯一标识符(OUI)由IEEE(电气和电子工程师协会)分配给厂商,它包含24位。厂商再用剩下的24位(EUI,扩展唯一标识符)为其生产的每个网卡分配一个全球唯一的全局管理地址,一般来说大厂商都会购买多个OUI。
I/G(Individual/Group)位,如果I/G=0,则是某台设备的MAC地址,即单播地址;如果I/G=1,则是多播地址(组播+广播=多播)。
G/L(Global/Local,也称为U/L位,其中U表示Universal)位,如果G/L=0,则是全局管理地址,由IEEE分配;如果G/L=1,则是本地管理地址,是网络管理员为了加强自己对网络管理而指定的地址。
参考博客:
arp详细讲解
MAC地址格式详解
TCP/IP协议——ARP详解
linux中ifconfig 命令详解详解
内核相关函数:
/**
 * is_valid_ether_addr - Determine if the given Ethernet address is valid
 * @addr: Pointer to a six-byte array containing the Ethernet address
 *
 * Check that the Ethernet address (MAC) is not 00:00:00:00:00:00, is not
 * a multicast address, and is not FF:FF:FF:FF:FF:FF.
 *
 * Return true if the address is valid.
 *
 * Please note: addr must be aligned to u16.
 */
static inline bool is_valid_ether_addr(const u8 *addr)
{
	/* FF:FF:FF:FF:FF:FF is a multicast address so we don't need to
	 * explicitly check for it here. */
	return !is_multicast_ether_addr(addr) && !is_zero_ether_addr(addr);
}

/**
 * eth_random_addr - Generate software assigned random Ethernet address
 * @addr: Pointer to a six-byte array containing the Ethernet address
 *
 * Generate a random Ethernet address (MAC) that is not multicast
 * and has the local assigned bit set.
 */
static inline void eth_random_addr(u8 *addr)
{
	get_random_bytes(addr, ETH_ALEN);
	addr[0] &= 0xfe;	/* clear multicast bit */
	addr[0] |= 0x02;	/* set local assignment bit (IEEE802) */
}
十三:BAR基址寄存器与总线地址
摘录:
物理地址与总线地址
- 物理地址是与CPU相关的。在CPU的地址信号线上产生的就是物理地址。在程序指令中的虚拟地址经过段映射和页面映射后,就生成了物理地址,这个物理地址被放到CPU的地址线上。 (从CPU端看)
- 总线地址,顾名思义,是与总线相关的,就是总线的地址线或在地址周期上产生的信号。 外设使用的是总线地址。(从设备端看)
- 物理地址与总线地址之间的关系由系统的设计决定的。在x86平台上,物理地址与PCI总线地址是相同的。 在其他平台上,也许会有某种转换,通常是线性的转换。
对于处理器来说,虚拟地址 逻辑地址都是一个输入源,处理器对这些地址进行转换(比如利用MMU),转换为物理地址,真正处理器发出的地址是物理地址。
假如某个PCI设备具有DMA能力,要去操作RAM,这时该设备看到的RAM的地址就应该是由系统总线映射到PCI总线上的总线地址。
映射关系由PCI控制器地址窗口来配置,一般是一个偏移量,所以这时映射到PCI总线上的RAM的总线地址就不是RAM在处理器系统地址空间上的物理地址(也可以称为系统总线地址)了。
因此总线地址 != 物理地址。
当然PCI控制器地址窗口可以配置为平映射,这时总线地址就跟物理地址相同了。
TLP能根据地址被路由到对应设备的BAR空间中去。比如说现在有一个mem read request,如果路由地址(地址信息包含在TLP中)是0x71000000,而有一个设备func0的mem空间范围是0x70000000~0x80000000,那么这个TLP就会被这个func处理。从func0的0x71000000对应的地址读取相应数据。这就是TLP中的地址字段和BAR空间的地址之间的关系
TLP中的地址哪里来?ATU(Address Translation Unit)转换过来的。这个问题就是这么的简单。ATU是什么?是一个地址转换单元,负责将一段存储器域的地址转换到PCIe总线域地址,除了地址转换外,还能提供访问类型等信息,这些信息都是ATU根据总线上的信号自己做的,数据都打包到TLP中,不用软件参与。软件需要做的是配置ATU,所以如果ATU配置完成,并且能正常工作,那么CPU访问PCIe空间就和访问本地存储器空间方法是一样的,只要读写即可。
BAR寄存器数据的初始化
BAR寄存器的数据是怎么初始化,由谁进行初始化的?因为初始化的数据是PCIE设备所在的总线域的地址空间,所以肯定不会是EP自己进行初始化,因为如果这样EP是不知道其他PCIE设备对应的总线地址空间的,所以可能会引起总线地址空间的冲突,所以BAR寄存器的初始化是由内核进行初始化的,在系统开机时,内核会遍历查找各个PCIE设备,然后为PCIE设备分配对应的总线地址空间。
BAR寄存器存储的总线地址和应用程序内存地址的关系
BAR寄存器存储的总线地址,应用程序是不能直接利用的,应用程序首先要做的就是读出BAR寄存器的值,然后用mmap函数建立应用程序内存空间和总线地址空间的映射关系。这样应用程序往PCIE设备内存读写数据的时候,直接利用PCIE设备映射到应用程序中的内存地址即可。但是应用程序的内存地址该由谁解析到PCIE设备对应的总线空间给EP呢,这个工作是由北桥或者是RC(root complex)来完成的,解析到总线地址空间之后,EP会把总线的地址空间解析成PCIE设备对应的设备内存地址。
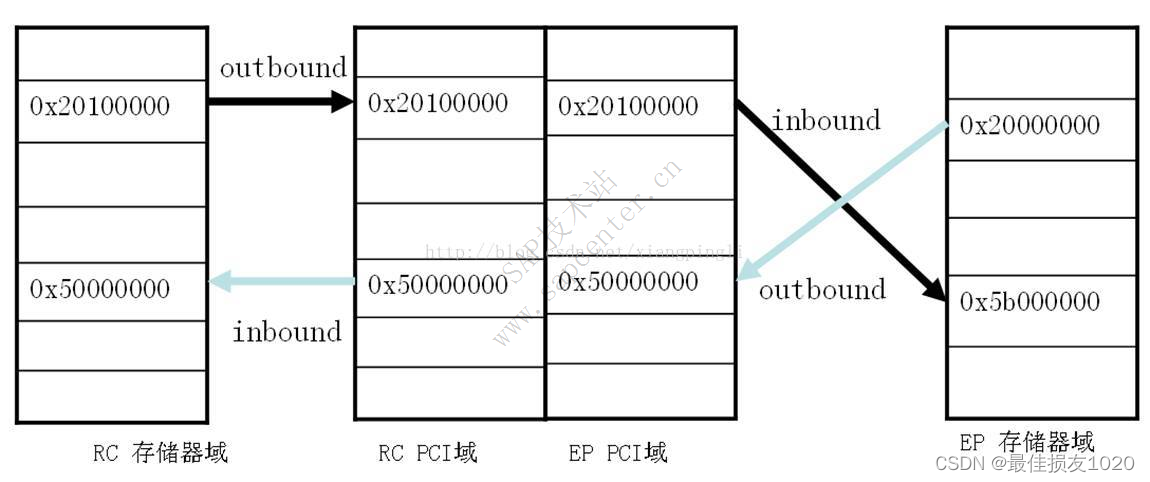
RC访问EP演示样例(黑色箭头):
(1)首先,RC端需要配置outbound(一般内核中配好),EP端须要inbound(0x5b000000 inbound到BAR2),这样就建立了RC端0x20100000(BAR2)到EP端0x5b000000的映射
(2)在EP端改动0x5b000000内存的内容,在RC端0x20100000能够看到对应的变化,从RC端读/写0x20100000和从EP端读/写0x5b000000,结果是一样的
对于EP,inbound一般是将BAR空间的总线地址与存储器域相应地址区间映射起来,outbound一般是访问主机内存地址。以linux 为RC+块设备为EP举例,在上电时linux内核会为块设备的各个BAR空间分配总线地址,块设备驱动的探测函数将总线地址与主机虚拟地址映射起来,EP自动将总线地址与存储器域相应分配的地址区间映射起来(配置inbound寄存器)。当主机想要读/写块设备数据时,将申请一块DMA缓冲区,并将缓冲区物理地址传递给块设备,这个物理地址就是PCI域的总线地址。以写操作为例,块设备若想读取主机内存中DMA缓冲区的数据,需进行一次映射,将相应的存储器域地址区间与DMA缓冲区物理地址进行一次映射(注意这两端地址区间不相同)。一般来说有两个相关的寄存器进行这样的偏移/映射(inbound寄存器与outbound寄存器),不搞固件 逻辑什么的,不太了解细节。
Generally speaking, if your card has SoC, the FW on the SoC will configure the iATU mapping with BAR match mode. And don’t let host side driver to configure it.
参考博客:
物理地址和总线地址区别
什么是物理地址、虚拟地址、总线地址
PCI设备配置空间、BAR空间、BUS总线的理解整理
PCIe实践之路:BAR空间和TLP
PCIE BAR空间
pcie inbound和outbound关系
PCI/PCIe iATU
十四 诡异的问题
在实现网卡驱动的数据收发功能时,使用start_xmit napi poll函数完成协议栈数据的收发,使用ioctl完成用户自定义数据收发。二者使用不同的消息通道,但大致功能一样,故将两个功能集成在一个函数中,使用参数type区分协议栈与用户自定义数据。
大致代码如下:
#define PROCOTOL_TYPE 0
#define IOCTL_TYPE 1
int send_recv_api(xxx,int type){
	if(type==PROCOTOL_TYPE){
		// 处理数据
		hardware_api(data,type1)
	}else if(type==IOCTL_TYPE){
		// 处理数据
		hardware_api(data,type2)
	}
}
然后网卡驱动加载,在未开启arp时,程序运行正常,实际上此时协议栈也未对数据进行处理与回复,两台主机加载驱动模块,不能相互ping通,主机并不会响应另一台主机的ARP request。而后将两个网卡的ARP功能打开,再次ping,接收ARP request的主机便当场死机。
由于暂时未调用用户自定义数据收发,故type一定为PROCOTOL_TYPE,故在函数前面加上判断
#define PROCOTOL_TYPE 0
#define IOCTL_TYPE 1
int send_recv_api(xxx,int type){
	if(type!=PROCOTOL_TYPE){
		// 打印错误信息
		return;
	}
	if(type==PROCOTOL_TYPE){
		// 处理数据
		hardware_api(data,type1)
	}else if(type==IOCTL_TYPE){
		// 处理数据
		hardware_api(data,type2)
	}
}
而后程序就能正常进行通信了,但问题在于错误信息并没有被打印,也就是说并没有进入这个分支
故将return语句注释掉,然后程序又崩溃了,而且崩溃时并未打印相关信息。
控制变量几次都是一样的效果,这就非常令人迷惑。不考虑问题的原因,单看问题的表象。
既然return语句有用,证明进入了该分支,那就应该有相应的打印语句
既然没有打印相关信息,证明就没进入过该分支
然后我怀疑打印函数是不是有问题,故在if语句前后打印信息,都打印成功。
由于函数基本逻辑比较简单,一般的想法便是程序哪块有点细节上的问题,例如赋值运算符与相等运算符,逗号运算符,运算符优先级等,但一直没找到程序的问题在哪里,而且越找类似的悖论就越多。
为什么进入这个分支却不打印信息呢? kgdb看崩溃时的输出也没看到进入其他分支的打印信息
搞了很久都没有解决这个问题,终于决定放弃了。最后想不如写成两个函数算了,没用几分钟就写完了。蚌
十五:利用信号量实现同步/互斥
场景:块设备一次只能处理一条命令,待一个请求执行完成后才能执行下一个请求
请求开始
执行必要的数据传输(写类型命令)
发送请求至块设备进行处理
等待设备返回请求执行结果
执行必要的数据传输(读类型命令)
请求完成
协议栈请求可直接使用blk_mq_start_request函数开始请求,blk_mq_end_request函数结束请求,对于ioctl用户自定义请求,我刚开始的实现方式如下:
代表用户进程执行的内核ioctl处理函数(进程上下文):
	解析用户请求
	申请内核缓冲区
	将请求数据从用户空间拷贝至内核缓冲区(写类型请求)
	发送请求至请求通道:
		当前请求通道空闲:
			将请求数据从内核缓冲区拷贝至DMA缓冲区(写类型请求)
			发送给块设备执行请求
		当前请求通道忙碌:压入内核FIFO队列
	每隔一段时间查看当前请求是否完成
	将请求数据从内核缓冲区拷贝至用户空间(读类型请求)
	请求完成
定时器轮询函数(中断上下文):
	定时接收块设备的请求执行结果
	若请求执行完成:
		将请求数据从DMA缓冲区拷贝至内核缓冲区(读类型请求)
		标识请求已经完成
		若FIFO队列存在请求,发送下一请求给块设备
申请内核缓冲区,并进行额外数据拷贝的原因是:请求并不是一开始就执行,它有可能被压入FIFO队列,在定时器轮询函数(中断上下文)执行请求,而在中断上下文又无法访问用户空间(参见 二:用户空间访问问题)。虽然以上的实现方式可以基本实现预期功能,但额外的数据拷贝,内核缓冲区,FIFO队列总是显得笨拙。在重新审视代码设计后发现,这个场景不就是同步与互斥吗?故修改代码,使用信号量完成预期功能。
同步信号量:sync (初值为0)  等待请求执行完成
互斥信号量:mutex (初值为1) 请求通道同一时间只能由一个进程访问
代表用户进程执行的内核ioctl处理函数(进程上下文):
	down_interruptible(&mutex)
	解析用户请求
	将请求数据从用户空间拷贝至DMA缓冲区(写类型请求)
	发送请求至块设备:
	down_interruptible(&sync)
	将请求数据从DMA缓冲区拷贝至用户空间(读类型请求)
	请求完成
	up(&mutex)
定时器轮询函数(中断上下文):
	定时接收块设备的请求执行结果
	若请求执行完成:
		up(&sync)
// 信号量
// jiffies指超时时间
extern int __must_check down_timeout(struct semaphore *sem, long jiffies);

int __init down_timeout_init(void)
{
    int ret;
    long iffies = 1000;                    //1000个时钟节拍,即是4s
    sema_init( &sema, 5 );                 //信号量初始化,count = 5

    /* 输出初始化后信号量的信息 */
    printk("after sema_init, sema.count: %d\n", sema.count);
    ret = down_timeout( &sema, iffies); //获取信号量

    /* 输出down_timeout操作后信号量的信息 */
    printk("first down_timeout, ret = %d\n", ret);
    printk("first down_timeout, sema.count: %d\n", sema.count);

    sema_init( &sema, 0 );                //信号量初始化,count = 0
    ret = down_timeout( &sema, iffies);

    printk("second down_timeout, ret = %d\n", ret);
    printk("second down_timeout, sema.count: %d\n", sema.count);
    return 0;
}
// 定时器
struct timer_list {
	/*
	 * All fields that change during normal runtime grouped to the
	 * same cacheline
	 */
	struct hlist_node	entry;
	unsigned long		expires;  // 过期时间
	void			(*function)(struct timer_list *);
	u32			flags;

#ifdef CONFIG_LOCKDEP
	struct lockdep_map	lockdep_map;
#endif
};

#include <linux/time.h>

/* 定义一个定时器指针 */
static struct timer_list timer = NULL;

/* 参数是timer中的变量data */
void function_handle(unsigned long data){
    /* 做你想做的事 */
    ......

    /* 因为内核定时器是一个单次的定时器,所以如果想要多次重复定时需要在定时器绑定的函数结尾重新装载时间,并启动定时 */
    /* Kernel Timer restart */
    mod_timer(&timer, jiffies + HZ);
}

int xxxx_init(void){
    /* 具体任务的注册等 */
    ......

    init_timer(&timer);                  /* 初始化定时器 */
    timer.function = function_handle;    /* 绑定定时时间到后的执行函数 */
    timer.expires = jiffies + HZ;        /* 定时的时间点,HZ是jiffies时钟的周期,当前时间的1s之后 */
    timer.data = 0;                      /* function_handle的参数*/
    add_timer(&timer);                   /* 添加并启动定时器 */
}


void xxxx_exit(void){
    /* 具体任务的卸载等 */
    ......

    /* 删除定时器 */
    del_timer(&timer);
}
两者时间的使用方式不同
[Linux]内核定时器(Timer)
Linux内核API down_timeout
聊聊Linux内核信号量
Linux内核API
十六:内核线程
承接第七点,使用内核线程进行轮询
打印相关信息
dbg("poll task:%d  irq:%d  atomic:%d",in_task(),in_interrupt(),in_atomic());
// poll task:1  irq:0  atomic:0
可以看出创建的内核线程处于进程上下文,不属于中断上下文,也不属于原子上下文,可以放心使用休眠函数,每执行一次轮询都可以调用msleep进行一次休眠。
在卸载驱动时,一直卡在rmmod操作处,发现忘了在remove函数中stop内核线程,但即使stop了内核线程,也还是卡在卸载驱动处。
阅读kthread_stop问题探讨才知道要在内核线程的while循环中调用kthread_should_stop()函数,查询是否应该退出线程。
int demo_thread1(void *data) {
	pr_info("%s ===>\n", __func__);
	while(!kthread_should_stop()) {
		pr_info("%s, I am alive\n", __func__);
	}
	pr_info("%s <===\n", __func__);
	return 23;
}
十七:竞争
在编写简单的块设备驱动时,使用轮询而不是中断的方式接收返回结果。在发送SQ后,定时轮询特定的BAR空间位置,获取对应的CQ。如何判断收到CQ呢?每次收到CQ后将该位置清零,若下次发现相应位置的数据的命令ID位恰好为期望的命令ID,则表示收到CQ。
data = readl(addr);
cid = data & CID_MASK >> CID_OFFSET
if(cid==expect_cid){
	接收处理
}
以上的处理流程似乎没有啥问题,但CQ由多个32位数组成,cid所属32位数写入成功并不代表所有的CQ都写入完成。故程序运行几十分钟会出现一次异常情况:其他32位数为0(即还没有写入,32位是写入数据的基本单位)。
可选的解决方案有:
- 使用中断告知数据已到达
- 对所有32位数都进行非零判断(需保证数据永远不为0)
- 增加一个标志位,在全部数据写入成功后设置该标志位
十八:调试相关
一:通过编译输出找出可能的问题(make gcc相关)
利用gcc 警告选项组合与标准错误重定向分析代码问题
#示例
EXTRA_CFLAGS :=  -g  -Wint-to-pointer-cast  -Wno-unused-parameter -Wno-sign-compare -Wno-unused-function  -Wno-format-extra-args -Wall-w
make xxx 2> build_output.txt
make -n:仅输出指令调用,但不执行,便于观察Makefile的修改是否生效
 - Call the first target specified in the Makefile (usually named "all"):
   make

 - Call a specific target:
   make {{target}}

 - Call a specific target, executing 4 jobs at a time in parallel:
   make -j{{4}} {{target}}

 - Use a specific Makefile:
   make --file {{file}}

 - Execute make from another directory:
   make --directory {{directory}}

 - Force making of a target, even if source files are unchanged:
   make --always-make {{target}}

 - Override variables defined in the Makefile by the environment:
   make --environment-overrides {{target}}
Makefile设置头文件路径
目录结构
--driver
----src(源文件目录)
------Makefile
----include(头文件目录)
通过Makefile位置找到头文件位置
mkfile_path := $(abspath $(lastword $(MAKEFILE_LIST)))
include_dir := $(abspath $(mkfile_path)/../../include)
ccflags-y += -g -I$(include_dir)
如何获取Makefile的当前相对目录?
Makefile 关于realpath的研究
二:运行调试
自定义内核打印函数,方便调试
// 输出函数
#ifdef DEBUG_OPT
#define dbg(format, arg...) printk(KERN_DEBUG format, ##arg);
#else
#define dbg(format, arg...) \
  do {                      \
  } while (0)
#endif

#ifdef WRAN_OPT
#define warn(format, arg...) printk(KERN_WARNNING format, ##arg);
#else
#define warn(format, arg...) \
  do {                       \
  } while (0)
#endif

#ifdef INFO_OPT
#define info(format, arg...) printk(KERN_INFO format, ##arg);
#else
#define info(format, arg...) \
  do {                       \
  } while (0)
#endif
obj-m			+= test.o
# -DINFO_OPT -DDEBUG_OPT -DWARN_OPT 输出选项
ccflags-y := -DWARN_OPT
test-y := test1.o test2.o
all:
	make -C /lib/modules/$(shell uname -r)/build/ M=$(PWD) modules
clean:
	make -C /lib/modules/$(shell uname -r)/build/ M=$(PWD) clean
do {…} while (0) 在宏定义中的作用
使用dmesg查看内核打印信息
dmesg -w # 实时查看dmesg输出
Usage:
 dmesg [options]

Display or control the kernel ring buffer.

Options:
 -C, --clear                 clear the kernel ring buffer
 -c, --read-clear            read and clear all messages
 -D, --console-off           disable printing messages to console
 -E, --console-on            enable printing messages to console
 -F, --file <file>           use the file instead of the kernel log buffer
 -f, --facility <list>       restrict output to defined facilities
 -H, --human                 human readable output
 -k, --kernel                display kernel messages
 -L, --color[=<when>]        colorize messages (auto, always or never)
                               colors are enabled by default
 -l, --level <list>          restrict output to defined levels
 -n, --console-level <level> set level of messages printed to console
 -P, --nopager               do not pipe output into a pager
 -p, --force-prefix          force timestamp output on each line of multi-line messages
 -r, --raw                   print the raw message buffer
 -S, --syslog                force to use syslog(2) rather than /dev/kmsg
 -s, --buffer-size <size>    buffer size to query the kernel ring buffer
 -u, --userspace             display userspace messages
 -w, --follow                wait for new messages
 -x, --decode                decode facility and level to readable string
 -d, --show-delta            show time delta between printed messages
 -e, --reltime               show local time and time delta in readable format
 -T, --ctime                 show human-readable timestamp (may be inaccurate!)
 -t, --notime                don't show any timestamp with messages
     --time-format <format>  show timestamp using the given format:
                               [delta|reltime|ctime|notime|iso]
Suspending/resume will make ctime and iso timestamps inaccurate.

 -h, --help                  display this help
 -V, --version               display version

Supported log facilities:
    kern - kernel messages
    user - random user-level messages
    mail - mail system
  daemon - system daemons
    auth - security/authorization messages
  syslog - messages generated internally by syslogd
     lpr - line printer subsystem
    news - network news subsystem

Supported log levels (priorities):
   emerg - system is unusable
   alert - action must be taken immediately
    crit - critical conditions
     err - error conditions
    warn - warning conditions
  notice - normal but significant condition
    info - informational
   debug - debug-level messages

For more details see dmesg(1).
调试方法:
1 检查异常情况,打印相关信息,立即返回(面向printk开机关机编程)
2 配置kgdb,使用kgdb打印内核崩溃时输出信息或通过断点调试
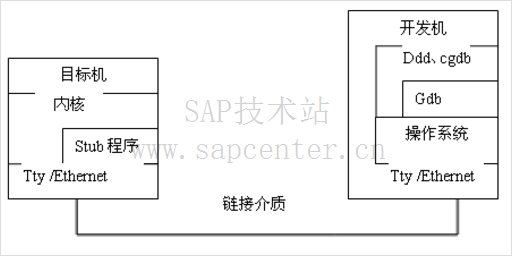
kgdb使用经验:
开发机:开发代码,运行驱动进行测试
调试机:使用kgdb通过串口调试开发机

两机器开发目录的绝对路径保持一致,将开发机代码拷贝至调试机同一位置
1 开发机
echo g > /proc/sysrq-trigger
此时开发机卡死
2 调试机
gdb vmlinux
set serial baud 115200
target remote /dev/ttyAMA1
看到输出后按c继续运行
此时开发机恢复正常
3 开发机
加载驱动 insmod xx.ko
查看插入驱动后代码段位置
cat /sys/module/驱动名/sections/.text
得到地址0x123456789
echo g > /proc/sysrq-trigger
4 调试机
add-symbol-file ko文件绝对路径 0x123456789
使用b打断点
按c继续运行
5 开发机
运行测试方法,击中断点
6 调试机
触发断点,打印相关信息

不过不知道为什么,按n有时候会进入中断(entry handler),导致无法调试
相关命令:
lx-dmesg
lx-symbols
注意驱动初始化时不能有错误,要不然无法得到驱动符号地址,为了方便,我们将测试的函数放在remove函数中,然后通过rmmod xx来触发断点。
调试过程中,被调试的内核运行在目标机上,GDB 调试器运行在开发机上。
使用 KGDB 调试 Kernel On Red Hat Linux
十九:调试经历
有些时候与其他开发人员沟通比一个人调试高效,但需确保自己已完全理解问题,可以完整表述问题且尝试了许多方法仍未解决
有可能程序实现并没有问题,程序已准确实现你心中的概念,但你对业务的理解有偏差,故不能单纯靠代码调试解决问题
调试经历1
我编写的驱动在openEuler上运行,但一插入驱动就报空指针错误,开始远程调试
编译运行环境,在x64 Ubuntu上交叉编译,在arm 嵌入式openEuler运行
1:首先dmesg查看内核日志,但很奇怪的是没有任何打印,驱动一加载就显示空指针错误,没有模块初始化时我加的的输出语句
检查日志输出级别也正常,可以输出info级别的消息,这相当于还没进入任何我编写的驱动部分就空指针异常了,而且崩溃时调用栈也全是不认识的函数。
所以我提出使用hello world简单驱动程序测试当前编译运行环境是否正常,而后发现hello world驱动程序出现同样的问题,后对方进行一些调整,解决问题
2:驱动插入时对BAR空间的信息全部错误(BAR起始地址,结束地址,标志位,大小),即pci_dev的resource成员的信息都很奇怪,但从lspci -v看来又是正确的,非常奇怪,怀疑是linux底层pci枚举出现问题,后想先将ioremap函数参数写成定值,暂时跳过该步,但接下来device_add_disk有发送非法地址访问错误,觉得BAR问题应该饶不开了,只能先解决这个问题
先切换运行环境内核版本为4.19,驱动运行正常,故代码没有太大问题,还是出在运行环境上,后应该是通过分离内核源码,配置方式重新编译驱动,不再统一编译,解决了该问题,我也不太了解
交叉编译,嵌入式,国产全是bug多发地
调试经历2
进行块设备驱动的验收,采用的数据收发流程和nvme类似,写sq,读cq。由于没有实现中断,只能轮询相应位置读取cq命令。但诡异的是用一个简单程序(在初始化函数中写sq,然后while循环读cq,直至读到相应cq命令)可以正常收发数据,而我的内核线程却一直轮询不到正确的数据,但观察串口打印确实执行了相应命令,cq相应位置的数据也确实发生了改变,唯独缺少了那个正确的数据。
示例
cq位置
我的程序输出
x
x
x
y
y
y

测试程序输出
x
x
x
z
y
y
y
后面对测试程序进行修改,和我内核线程一样使用一定的休眠延时,同样没有收到cq。合理推测这数据会过期,只能在一定时间内取到,但不理解为什么要把cq数据设置为定时的数据。直到后面与固件开发人员交流后才发现原来cq逻辑是这样的:cq对应位置是一个fifo,刚开始数据确实在fifo中,但随即device会将fifo数据传递给host的fifo,所以我们本不应该在cq fifo读到数据,只是频率太高,凑巧读到了。
调试经历3
由于块设备驱动一次只能发送一条指令,对于协议栈请求,我的处理方式如下:
int allow = 1;

请求到达
if(allow==1){
    allow = 0;
	执行请求
}else{
	将请求入队
}

请求处理完成
allow = 1;
下一个请求出队,处理该请求
请求队列的tagset.queue_depth设的比较大,一次可能有多个请求到达。所以问题就很明显了,并发导致竞态。
当执行mkfs命令格式化文件系统时,一时间有多个请求到达,可能有多个请求同时进入了allow==1分支,导致向SQ写入的命令非常诡异
解决方法也比较简单,就是使用原子变量
atomic_t allow;
atomic_set(&allow, 1);
请求到达
// atomic_cmpxchg(v, old, new)
// 执行原子比较交换,如果原子变量v的值等于old,那么把原子变量v的值设置为new,返回值总是原子变量v的旧值
if(atomic_cmpxchg(&allow,1,0)==1){
	执行请求
}else{
	将请求入队
}

请求处理完成
atomic_set(&allow, 1);
下一个请求出队,处理该请求
这种模式的问题如果放在多线程专题的实验或者锁专题的实验里面一眼就能看出来了,但实际工程中却比较容易犯,因为在写项目代码中没有人暗示需要进行处理并发问题,就比如运算符优先级问题,==与=之类的,理论上都不会犯,但实际写代码时就是容易写出类似的代码,这也是工程实践的意义
二十:设置文件系统块大小
由于块设备驱动最小只支持64K数据读取,修改内核设置页大小又觉得有点麻烦,后面看到在mkfs就有设置块大小的选项
mkfs.ext4: invalid option -- '-'
Usage: mkfs.ext4 [-c|-l filename] [-b block-size] [-C cluster-size]
        [-i bytes-per-inode] [-I inode-size] [-J journal-options]
        [-G flex-group-size] [-N number-of-inodes] [-d root-directory]
        [-m reserved-blocks-percentage] [-o creator-os]
        [-g blocks-per-group] [-L volume-label] [-M last-mounted-directory]
        [-O feature[,...]] [-r fs-revision] [-E extended-option[,...]]
        [-t fs-type] [-T usage-type ] [-U UUID] [-e errors_behavior][-z undo_file]
        [-jnqvDFSV] device [blocks-count]
示例
mkfs.ext4   -b 65536 /dev/nvme1n1p1
Warning: blocksize 65536 not usable on most systems.
mke2fs 1.45.5 (07-Jan-2020)
/dev/nvme1n1p1 contains a ext4 file system
        created on Fri Apr 21 17:00:47 2023
Proceed anyway? (y,N) y
mkfs.ext4: 65536-byte blocks too big for system (max 4096)
Proceed anyway? (y,N) y
Warning: 65536-byte blocks too big for system (max 4096), forced to continue
Creating filesystem with 163824 64k blocks and 164352 inodes
Filesystem UUID: 0d389dff-8d36-43b1-8362-2482ef7002b7
Superblock backups stored on blocks:
        65528

Allocating group tables: done
Writing inode tables: done
Creating journal (4096 blocks): done
Writing superblocks and filesystem accounting information: done
本来以为大功告成了,但挂载时出错
mount -t ext4   /dev/nvme1n1p1 test
mount: test: wrong fs type, bad option, bad superblock on /dev/nvme1n1p1, missing codepage or helper program, or other error.

dmesg输出
[18738.045713] EXT4-fs (nvme1n1p1): bad block size 65536
当时想研究一下ext4文件系统的实现细节,看一看哪个环节出了错误,后面才看到有现成的命令输出文件系统信息,所以说遇到问题先找工具,看看有没有现成的,不要重复造轮子
tldr dumpe2fs
dumpe2fs
Print the super block and blocks group information for ext2/ext3/ext4 filesystems.Unmount the partition before running this command using umount {{device}}.More information: https://manned.org/dumpe2fs.

 - Display ext2, ext3 and ext4 filesystem information:
   dumpe2fs {{/dev/sdXN}}

 - Display the blocks which are reserved as bad in the filesystem:
   dumpe2fs -b {{/dev/sdXN}}

 - Force display filesystem information even with unrecognizable feature flags:
   dumpe2fs -f {{/dev/sdXN}}

 - Only display the superblock information and not any of the block group descriptor detail information:
   dumpe2fs -h {{/dev/sdXN}}

 - Print the detailed group information block numbers in hexadecimal format:
   dumpe2fs -x {{/dev/sdXN}}
dumpe2fs /dev/nvme1n1p1
dumpe2fs 1.45.5 (07-Jan-2020)
Filesystem volume name:   <none>
Last mounted on:          <not available>
Filesystem UUID:          0d389dff-8d36-43b1-8362-2482ef7002b7
Filesystem magic number:  0xEF53
Filesystem revision #:    1 (dynamic)
Filesystem features:      has_journal ext_attr resize_inode dir_index filetype extent 64bit flex_bg sparse_super large_file huge_file dir_nlink extra_isize metadata_csum
Filesystem flags:         signed_directory_hash
Default mount options:    user_xattr acl
Filesystem state:         clean
Errors behavior:          Continue
Filesystem OS type:       Linux
Inode count:              164352
Block count:              163824
Reserved block count:     8191
Free blocks:              159068
Free inodes:              164341
First block:              0
Block size:               65536
Fragment size:            65536
Group descriptor size:    64
Reserved GDT blocks:      2
Blocks per group:         65528
Fragments per group:      65528
Inodes per group:         54784
Inode blocks per group:   214
Flex block group size:    16
Filesystem created:       Sun Apr 23 11:16:03 2023
Last mount time:          n/a
Last write time:          Sun Apr 23 11:16:03 2023
Mount count:              0
Maximum mount count:      -1
Last checked:             Sun Apr 23 11:16:03 2023
Check interval:           0 (<none>)
Lifetime writes:          261 kB
Reserved blocks uid:      0 (user root)
Reserved blocks gid:      0 (group root)
First inode:              11
Inode size:               256
Required extra isize:     32
Desired extra isize:      32
Journal inode:            8
Default directory hash:   half_md4
Directory Hash Seed:      bd1ab816-317b-43f9-b664-1d1f1bf2962a
Journal backup:           inode blocks
Checksum type:            crc32c
Checksum:                 0x4a3a900f
Journal features:         (none)
Journal size:             256M
Journal length:           4096
Journal sequence:         0x00000001
Journal start:            0


Group 0: (Blocks 0-65527) csum 0x3132
  Primary superblock at 0, Group descriptors at 1-1
  Reserved GDT blocks at 2-3
  Block bitmap at 4 (+4), csum 0x0e2f600d
  Inode bitmap at 7 (+7), csum 0x5eb14e2c
  Inode table at 10-223 (+10)
  64872 free blocks, 54773 free inodes, 2 directories, 54773 unused inodes
  Free blocks: 656-65527
  Free inodes: 12-54784
Group 1: (Blocks 65528-131055) csum 0x80b5 [INODE_UNINIT]
  Backup superblock at 65528, Group descriptors at 65529-65529
  Reserved GDT blocks at 65530-65531
  Block bitmap at 5 (bg #0 + 5), csum 0x1c5bc20f
  Inode bitmap at 8 (bg #0 + 8), csum 0x00000000
  Inode table at 224-437 (bg #0 + 224)
  61428 free blocks, 54784 free inodes, 0 directories, 54784 unused inodes
  Free blocks: 69628-131055
  Free inodes: 54785-109568
Group 2: (Blocks 131056-163823) csum 0x06dc [INODE_UNINIT]
  Block bitmap at 6 (bg #0 + 6), csum 0xa7a42c48
  Inode bitmap at 9 (bg #0 + 9), csum 0x00000000
  Inode table at 438-651 (bg #0 + 438)
  32768 free blocks, 54784 free inodes, 0 directories, 54784 unused inodes
  Free blocks: 131056-163823
  Free inodes: 109569-164352
常规的方法行不通,就去网上找找有没有其他方法,然后就看到了这篇帖子
How can I mount filesystems with > 4KB block sizes?
5分钟搞懂用户空间文件系统FUSE工作原理
使用用户文件系统的方式挂载分区
fuseext2 /dev/nvme1n1p1 test_dir -o rw+
fuse-umfuse-ext2: version:'0.4', fuse_version:'29' [main (fuse-ext2.c:331)]
fuse-umfuse-ext2: enter [do_probe (do_probe.c:30)]
fuse-umfuse-ext2: leave [do_probe (do_probe.c:55)]
fuse-umfuse-ext2: opts.device: /dev/nvme1n1p1 [main (fuse-ext2.c:358)]
fuse-umfuse-ext2: opts.mnt_point: test_dir [main (fuse-ext2.c:359)]
fuse-umfuse-ext2: opts.volname:  [main (fuse-ext2.c:360)]
fuse-umfuse-ext2: opts.options: rw+ [main (fuse-ext2.c:361)]
fuse-umfuse-ext2: parsed_options: rw,fsname=/dev/nvme1n1p1 [main (fuse-ext2.c:362)]
fuse-umfuse-ext2: mounting read-write [main (fuse-ext2.c:376)]
此时就可以正常使用分区且lsblk可以看到挂载目录
二十一:数据落盘
背景:块设备为保证数据落盘,关机前需发送shutdown指令,执行完shutdown指令后设备不再处理请求
第一个解决方案:关机前执行程序,手动发送shutdown指令
由于执行完shutdown指令后协议栈仍然会下发请求,故需记录当前是否执行shutdown指令,若执行了shutdown指令则直接结束请求。
这种方式的问题在于:①手动执行shutdown指令比较麻烦 ②关机时操作系统会将页缓存的数据刷入硬盘,若执行了shutdown指令则请求不能执行
第二个解决方案:驱动关机时自动发送shutdown指令
刚开始的时候我觉得驱动在关机的时候也会执行remove函数(不知道为什么),所以我在remove函数中向设备发送shutdown指令,但关机时看设备的串口打印并没有看到执行shutdown指令,故关机并不会执行remove函数,后在nvme驱动代码中找了一下,看到了shutdown函数,故在shutdown函数中发送shutdown指令并等待执行执行完成。这样实现后就能从串口中看到关机时首先执行了许多write指令,最后执行一个shutdown指令。
struct module;

/**
 * struct pci_driver - PCI driver structure
 * @node:	List of driver structures.
 * @name:	Driver name.
 * @id_table:	Pointer to table of device IDs the driver is
 *		interested in.  Most drivers should export this
 *		table using MODULE_DEVICE_TABLE(pci,...).
 * @probe:	This probing function gets called (during execution
 *		of pci_register_driver() for already existing
 *		devices or later if a new device gets inserted) for
 *		all PCI devices which match the ID table and are not
 *		"owned" by the other drivers yet. This function gets
 *		passed a "struct pci_dev \*" for each device whose
 *		entry in the ID table matches the device. The probe
 *		function returns zero when the driver chooses to
 *		take "ownership" of the device or an error code
 *		(negative number) otherwise.
 *		The probe function always gets called from process
 *		context, so it can sleep.
 * @remove:	The remove() function gets called whenever a device
 *		being handled by this driver is removed (either during
 *		deregistration of the driver or when it's manually
 *		pulled out of a hot-pluggable slot).
 *		The remove function always gets called from process
 *		context, so it can sleep.
 * @suspend:	Put device into low power state.
 * @suspend_late: Put device into low power state.
 * @resume_early: Wake device from low power state.
 * @resume:	Wake device from low power state.
 *		(Please see Documentation/power/pci.rst for descriptions
 *		of PCI Power Management and the related functions.)
 * @shutdown:	Hook into reboot_notifier_list (kernel/sys.c).
 *		Intended to stop any idling DMA operations.
 *		Useful for enabling wake-on-lan (NIC) or changing
 *		the power state of a device before reboot.
 *		e.g. drivers/net/e100.c.
 * @sriov_configure: Optional driver callback to allow configuration of
 *		number of VFs to enable via sysfs "sriov_numvfs" file.
 * @err_handler: See Documentation/PCI/pci-error-recovery.rst
 * @groups:	Sysfs attribute groups.
 * @driver:	Driver model structure.
 * @dynids:	List of dynamically added device IDs.
 */
struct pci_driver {
	struct list_head	node;
	const char		*name;
	const struct pci_device_id *id_table;	/* Must be non-NULL for probe to be called */
	int  (*probe)(struct pci_dev *dev, const struct pci_device_id *id);	/* New device inserted */
	void (*remove)(struct pci_dev *dev);	/* Device removed (NULL if not a hot-plug capable driver) */
	int  (*suspend)(struct pci_dev *dev, pm_message_t state);	/* Device suspended */
	int  (*suspend_late)(struct pci_dev *dev, pm_message_t state);
	int  (*resume_early)(struct pci_dev *dev);
	int  (*resume)(struct pci_dev *dev);	/* Device woken up */
	void (*shutdown)(struct pci_dev *dev);
	int  (*sriov_configure)(struct pci_dev *dev, int num_vfs); /* On PF */
	const struct pci_error_handlers *err_handler;
	const struct attribute_group **groups;
	struct device_driver	driver;
	struct pci_dynids	dynids;
};
static void nvme_shutdown(struct pci_dev *pdev)
{
	struct nvme_dev *dev = pci_get_drvdata(pdev);
	nvme_dev_disable(dev, true);
}

static struct pci_driver nvme_driver = {
	.name		= "nvme",
	.id_table	= nvme_id_table,
	.probe		= nvme_probe,
	.remove		= nvme_remove,
	.shutdown	= nvme_shutdown,
	.driver		= {
		.pm	= &nvme_dev_pm_ops,
	},
	.sriov_configure = pci_sriov_configure_simple,
	.err_handler	= &nvme_err_handler,
};
二十二 kfifo误区
写块设备驱动代码时使用kfifo保证一次只发一个请求,搜Kfifo用法时候看到“内核无锁队列”这几个词,自然而然没有对Kfifo加锁,但驱动写完测试的时候出队的结果千奇百怪,刚开始还找是不是其他模块出了问题,通过打印发现就是队列取出的数据有问题,所以看一看Kfifo源码,看到了以下注释:
include/linux/kfifo.h
/*
 * Note about locking: There is no locking required until only one reader
 * and one writer is using the fifo and no kfifo_reset() will be called.
 * kfifo_reset_out() can be safely used, until it will be only called
 * in the reader thread.
 * For multiple writer and one reader there is only a need to lock the writer.
 * And vice versa for only one writer and multiple reader there is only a need
 * to lock the reader.
 */

 /**
 * kfifo_in_spinlocked - put data into the fifo using a spinlock for locking
 * @fifo: address of the fifo to be used
 * @buf: the data to be added
 * @n: number of elements to be added
 * @lock: pointer to the spinlock to use for locking
 *
 * This macro copies the given values buffer into the fifo and returns the
 * number of copied elements.
 */
#define	kfifo_in_spinlocked(fifo, buf, n, lock) \
({ \
	unsigned long __flags; \
	unsigned int __ret; \
	spin_lock_irqsave(lock, __flags); \
	__ret = kfifo_in(fifo, buf, n); \
	spin_unlock_irqrestore(lock, __flags); \
	__ret; \
})

/**
 * kfifo_out_spinlocked - get data from the fifo using a spinlock for locking
 * @fifo: address of the fifo to be used
 * @buf: pointer to the storage buffer
 * @n: max. number of elements to get
 * @lock: pointer to the spinlock to use for locking
 *
 * This macro get the data from the fifo and return the numbers of elements
 * copied.
 */
#define	kfifo_out_spinlocked(fifo, buf, n, lock) \
__kfifo_uint_must_check_helper( \
({ \
	unsigned long __flags; \
	unsigned int __ret; \
	spin_lock_irqsave(lock, __flags); \
	__ret = kfifo_out(fifo, buf, n); \
	spin_unlock_irqrestore(lock, __flags); \
	__ret; \
}) \
)
所以说有多个写者/读者的时候还是需要加锁的,只是单个读者+单个写者不需要加锁
相关博客推荐:
linux内核之无锁缓冲队列kfifo原理(结合项目实践)
kfifo(内核无锁队列)
                                               |<--写入-->|
+--------------------------------------------------------------+
|                        |<----------data----->|               |
+--------------------------------------------------------------+
                         |<--读取-->|
                         ^                     ^               ^
                         |                     |               |
                        out                   in              size
杂项
- 使用iperf测试tcp udp性能,使用tcpdump进行网络抓包,apt若由于其他软件锁死依赖,可删除不需要的软件再进行安装。
apt autoremove
apt -f install
apt update
apt upgrade
- 不同网卡ip最好位于不同的网段,不然会引起许多奇奇怪怪的问题。+
- gcc时使用-D指定宏
CFLAGS += -DM1 -DM2
test:test.c
	gcc test.c -o test  $(CFLAGS)
#include <stdio.h>

int main() {
#ifdef M1
  printf("M1\n");
#endif
#ifdef M2
  printf("M1\n");
#endif
}
- 可以通过手机USB共享网络(手机热点有USB共享网络选项),连接至linux后设置IP即可联网。
Linux通过手机USB网络共享上网
相关命令:
route
arp -a
ifconfig
tcpdump -i 网卡名
ip route add default via 192.168.xxx.xxx dev 网卡名
相连的电脑只要一个电脑能够上网,其余电脑可将该电脑IP设置为默认路由,正确设置dns服务器即可上网,最好使用出名的DNS服务器(114.114.114.114 8.8.8.8)。
盘点国内外优秀公共DNS
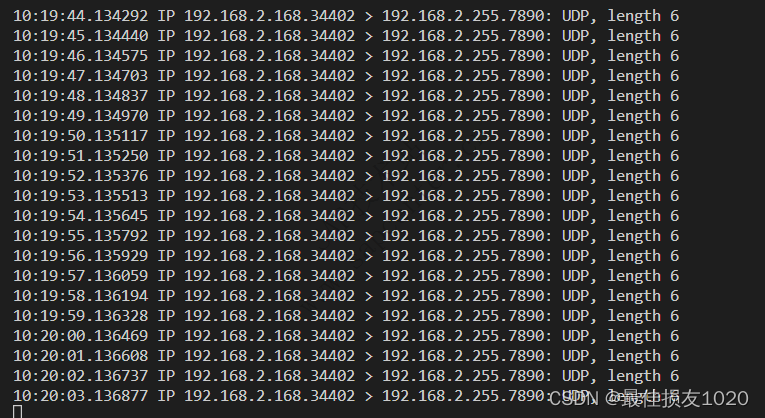
UDP丢包率测试
server使用recvfrom接收数据包,返回值小于指定长度则退出while循环,输出接收数据包数目。
client使用sendto向server发送指定长度的数据包。
end程序向server发送一个小于指定长度的数据包,指示测试过程结束。
对比server接收的数据包数目与client发送的数据包数目,计算丢包率,client可开多个线程同时发送宏定义常量时可以定义生僻的值而不是0 1之类常见的值
注意相等运算符别少写一个=,可以使用0==n的方式避免出错
printf是一个行缓冲函数,先写到缓冲区,满足条件后,才将缓冲区刷到对应文件中,刷缓冲区的条件如下:
1 缓冲区填满
2 写入的字符中有"\n" “\r”
3 调用fflush手动刷新缓冲区
4 调用scanf要从缓冲区中读取数据时,也会将缓冲区内的数据刷新
C printf()函数不显示输出内容
不过十四中提到的输出不打印的问题不是因为这个,因为在宏实现中已经加了换行符
#define printf(fmt, arg...) printk(KERN_ALERT "%s> " fmt "\n", __FUNCTION__, ##arg)
- 使用U盘复制文件,原本6G的文件,只复制了4G,最后发现是文件系统本身(FAT32)的限制,可以重新格式化U盘或拆分该文件
- ubuntu系统关闭unattended upgrades无人值守更新功能
sudo apt remove unattended-upgrades
- 移动硬盘无法弹出,显示被进程占用(system占用)
关掉索引选项
一些命令
dd if=/dev/zero of=file4 bs=1G count=1 # 创建指定容量文件
scp file  yy@192.168.2.168:/home/yy/kylin/test_driver/test
chmod 777 . -R    # 将当前目录所有文件rwx全部设置
chown yy:yy  . -R # 设置当前目录所有文件拥有者
sysctl -w net.core.rmem_default=1821440
sysctl -w net.core.wmem_default=1821440
lsof -i:7890 # 查看7890端口监听进程信息,有时候需要root权限
使用FileZilla传输文件,Failed to convert command to 8 bit charset
FileZilla出现Failed to convert command to 8 bit charset
linux-网络数据包抓取-tcpdump
tcp参数设置
linux socket 缓存: core rmem_default rmem_max
重启解决部分问题,关机再开机解决大部分问题
重装系统解决绝大部分问题,换新设备解决一切问题
#undef MACRO_NAME // 取消宏定义
#include <stdio.h>

#define ERROR_TYPE1_BASE 100
#define ERROR_TYPE1_1 ERROR_TYPE1_BASE + 1
#define ERROR_TYPE1_2 ERROR_TYPE1_BASE + 2

#define ERROR_TYPE2_BASE 200
#define ERROR_TYPE2_1 ERROR_TYPE2_BASE + 1
#define ERROR_TYPE2_2 ERROR_TYPE2_BASE + 2

#define ERROR_TYPE3_BASE 300
enum ERROR_TYPE3 { ERROR_TYPE3_1 = ERROR_TYPE3_BASE + 1, ERROR_TYPE3_2 };

int main() { printf("%d %d %d %d %d %d", ERROR_TYPE1_1, ERROR_TYPE1_2, ERROR_TYPE2_1, ERROR_TYPE2_2, ERROR_TYPE3_1, ERROR_TYPE3_2); }
/*
101 102 201 202 301 302
*/
错误返回值可以不同类型定义在不同区间,枚举设置起始值,这样即使函数层层嵌套都能迅速找到错误位置。
在定义宏时记得加上括号,确保运算时的优先级,避免一些奇奇怪怪的问题。
网卡ioctl用户程序
#include <arpa/inet.h>
#include <errno.h>
#include <fcntl.h>
#include <net/if.h>
#include <net/if_arp.h>
#include <net/route.h>
#include <netinet/in.h>
#include <stdio.h>
#include <stdlib.h>
#include <string.h>
#include <sys/ioctl.h>
#include <sys/stat.h>
#include <sys/types.h>
#include <unistd.h>
#define TEST_CMD 0x89F3
int main(int argc, char *argv[]) {
  struct ifreq ifr = {0};
  memset(&ifr, 0, sizeof(ifr));
  ifr.ifr_addr.sa_family = AF_INET;
  int data = 1;
  ifr.ifr_ifru.ifru_data = (void *)&data; // 传递用户数据
  strcpy(ifr.ifr_name, "网卡名");
  int fd = socket(AF_INET, SOCK_DGRAM, 0);
  if (fd <= 0) {
    printf("create socket fd failed");
    return -1;
  }
  int ret = ioctl(fd, TEST_CMD, &ifr);
  if (ret < 0) {
    printf("ioctl failed,%d %d\n", ret, errno);
  }

  return 0;
}
UDP广播程序
// 发送端
#include <stdio.h>
#include <sys/socket.h>
#include <unistd.h>
#include <sys/types.h>
#include <netdb.h>
#include <netinet/in.h>
#include <arpa/inet.h>
#include <string.h>

int main() {
  int sock = -1;
  if ((sock = socket(AF_INET, SOCK_DGRAM, 0)) == -1) {
    printf("socket error");
    return -1;
  }
  const int opt = 1;
  //设置该套接字为广播类型,
  int nb = 0;
  nb = setsockopt(sock, SOL_SOCKET, SO_BROADCAST, (char *)&opt, sizeof(opt));
  if (nb == -1) {
    printf("set socket error...");
    return -1;
  }
  //指定Server IP  和  发送给Client的端口
  struct sockaddr_in addrto;
  bzero(&addrto, sizeof(struct sockaddr_in));
  addrto.sin_family = AF_INET;
  addrto.sin_addr.s_addr = inet_addr("192.168.2.255");
  addrto.sin_port = htons(7890);
  int nlen = sizeof(addrto);
  char *msg = "abcdef";
  while (1) {
    sleep(1);
    //从广播地址发送消息
    int ret = sendto(sock, msg, strlen(msg), 0, (struct sockaddr *)&addrto, nlen);
    if (ret < 0) {
      printf("send error\n");
    } else {
      printf("ok\n");
    }
  }
  return 0;
}

// 接收端
#include <stdio.h>
#include <sys/types.h>
#include <sys/socket.h>
#include <netinet/in.h>
#include <arpa/inet.h>
#include <string.h>
#include <sys/types.h>
#include <sys/stat.h>
#include <fcntl.h>
#include <unistd.h>
#include <sys/ioctl.h>
#include <net/if.h>
#include <arpa/inet.h>
#include <errno.h>
#include <netinet/in.h>
#include <net/route.h>
#include <net/if_arp.h>

#define MAXBUF 2000

int main() {
  struct sockaddr_in server_addr;
  struct sockaddr_in client_addr;
  int addr_size = sizeof(client_addr);
  char buf[MAXBUF];
  int cc;
  int server_sock = socket(AF_INET, SOCK_DGRAM, IPPROTO_UDP);

  memset(&server_addr, 0, addr_size);
  server_addr.sin_family = AF_INET;
  server_addr.sin_addr.s_addr = htons(INADDR_ANY); // inet_addr("192.168.2.123");
  server_addr.sin_port = htons(7890);
  cc = bind(server_sock, (struct sockaddr *)&server_addr, sizeof(struct sockaddr));
  if (cc < 0) {
    printf("bind error\n");
  } else {
    printf("bind success\n");
  }
  printf("listen packet\n");
  while (1) {
    cc = recvfrom(server_sock, buf, MAXBUF, 0, (struct sockaddr *)&client_addr, &addr_size);
    printf(" recv msg is %s\n", buf);
  }
  return 0;
}
重点在于发送端调用setsockopt设置为广播类型,接收端绑定INADDR_ANY而不是特定网卡地址
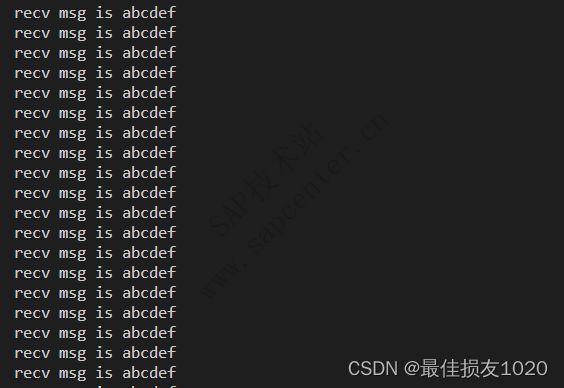
参考:UDP之广播
推荐阅读
linux内核可加载模块的makefile
linux内核makefile概览
内核模块中使用本地头文件
Linux下头文件搜索路径
linux 内核头文件及内核库文件
Linux内核头文件
Linux errno详解
Linux内核API
Linux Kernel 学习的一些资源
如何编译 Linux 内核
Ubuntu Linux内核版本升级或降级到指定版本(基于ubuntu 18.04示例)
文章来自于网络,如果侵犯了您的权益,请联系站长删除!